Course Pages

Belongs to themes:

By selecting a degree programme you are able to see the general content as well as the possible degree programme-specific content.

Use course pages to describe your courses

Each implementation (individual course) in Sisu has its own course page in the Studies Service.
The purpose of these pages is to convey to students important basic information on courses: what a course is about, what kind of work it entails and how it is completed. Course pages are public and accessible through the University’s web services.

As a teacher, you have a central role in producing content for course pages. Interesting and clear content boosts the visibility of your teaching and attracts students interested in the topic.

Through course pages, you can also create Moodle areas for courses, request lists of course participants and send email to students taking your courses. 

This page contains instructions on completing and using course pages.

You can also familiarise yourself with course pages with the help of this example course.

Support requests and feedback related to course pages can be sent to: opa-palvelukehitys@helsinki.fi.

Find your course pages on Flamma

Course pages are created automatically when education coordinators or Open University education specialists create implementations in Sisu or transfer them from Optime to Sisu. 

The easiest way to find links to the course pages of all of your courses is through the ‘Teacher’ role on Flamma (under ‘My teaching’). By selecting ‘Drafts’ as the filter, you can also edit course pages for implementations that are not yet public in Sisu. As a rule, the implementations of the upcoming academic year are published by the end of June, while summer courses are usually published by the end of March at the latest. 

All of the University’s public course pages can be browsed through the course search of the Studies Service. 

How to edit course pages

You will see an ‘Edit course page’ button on your course page when logged into the service with your University credentials. 

If you don’t see the edit button, check that your name is indicated at the beginning of the course page in the section that lists all the teachers in the course. If your name is missing, you have not yet been registered as a course teacher in Sisu. In such cases, please contact the education coordinator of your degree programme, who can add you as a teacher for the relevant implementation.

When editing the course page for the first time, you are asked to select the default language for the course page. Usually this is the same as the language of instruction of the course. Add content on the course page first using this language. You can later create other language versions of your course page.

Course pages can be edited by all course teachers and key administrative staff.

Add the following details and content to course pages

Through course pages, students must have access to all of the information and material required to complete courses.

Some course page content is transferred from Sisu by automated means already in conjunction with publishing the course page. These details include teaching schedules, registration instructions for open university education and a link to course information. In addition, grades recorded in Sisu, written feedback provided and the grade distribution are automatically displayed to students on course pages at the end of courses, once these details have been entered in Sisu. 

As a teacher, you must add to course pages any other information relevant to students in the dedicated field:

  • The course’s description
  • Matters related to the course’s schedule requiring particular attention (e.g., attendance requirement) 
  • Key details and instructions related to course completion
  • Materials used in the course and information on where to find them
  • Information on Zoom lectures
  • Link to the course’s Moodle area
  • Link to the course’s MOOC online learning environment 

If you create a Moodle area through a course page, a link will be displayed automatically (see detailed instructions at Create a Moodle area for your course). In other cases, add the link to the Moodle area and, if necessary, the course key in ‘Moodle’ > ‘Using an existing Moodle area’.

In the edit mode, the course page guides and supports your efforts. In connection with various content fields, you will find more detailed instructions and example content that you can use to write your own texts.

Please also note that content from previous course pages can easily be copied to the course pages of new courses (see detailed instructions below).

If your course includes openly available places, the course page content should be completed well before the academic year or term begins. This will ensure that those interested in studying receive timely information on course content and working methods, and can consider registering on the basis of this information.

Remember always to save all changes you make to course pages. 

Copy content from an earlier course page

If you have previously created good course pages, you can copy all or part of their content to the course pages of courses to be given again.


How to copy course page content:

  • Open the course page of a previously given course in your browser.
  • Find the course page for the upcoming course and log in.
  • Click ‘Edit course page’.
  • Click ‘Copy the content of this language version from another course page’.
  • In the field that opens, add the address of the previously given course and click ‘Copy course page’.
  • The content of the previous course page will now be copied to the new course page, with the exception of the Moodle and Zoom links, the ‘NB!’ message and the ‘Results’ section.
  • Check the copied content and edit or update it as needed.
  • Save.
     

Display-view: Copy content from earlier course page


NB! If you copy several language versions, the content of each version must be copied separately from the previous page. Start the copying from the default language version. 

Share course materials on course pages

During courses that incorporate Moodle, use Moodle as the primary channel for sharing course materials (e.g., PowerPoint slides) and student communication. 

If you are not using Moodle on your course or wish to share some material with students before Moodle opens, you can also add it to the course page. You may limit the access to links and materials only to course participants.

How to share course materials through course pages:

  • Log in to the course page.
  • Click ‘Edit course page’.
  • In the ‘Materials’ section, you can tell students about the materials and how to use them.
  • Add the desired files and links one at a time to the section. You may limit the access to each material you add only to course participants.
  • If necessary, you can add brief descriptions or instructions to individual files and links.
  • If necessary, reorganise the materials by dragging them from the arrow icon.
  • You can add sub-headings to the ‘Materials’ section for grouping materials.
  • Save the course page.

Create Moodle areas for your courses

You can easily create Moodle areas for your courses from course pages. When doing so, the Moodle area will automatically import students admitted to the course from Sisu and enable the export of grades directly from Moodle to Sisu.

How to create a Moodle area:

  • Log in to the course page.
  • Click ‘Edit course page’.
  • Click ‘Create new Moodle area’.
  • Save the course page.

The creation of Moodle areas may take a while if there are many students to be imported to Moodle or the import service is temporarily congested. If necessary, you can review the completion of the Moodle area by refreshing the information on the creation progress in the user interface.

A link to the new Moodle area will be displayed automatically on the course page when you save the page. The Moodle button will be displayed on the course page for all users, but only course participants can access the Moodle area, and only after the area has been opened in Moodle.

Display-view: Create a new Moodle area

In addition to course pages, links to Moodle areas are displayed on the student calendar in the Studies Service and under the ‘Teacher’ role on Flamma. If you wish, you can remove the links from all of these locations by deselecting ‘Show Moodle link on the course page’. Please note that removing the link does not remove the Moodle area created from Moodle itself. 

If you wish to remove a Moodle area you have created, please contact Moodle support (moodle@helsinki.fi).

Remember to open Moodle areas for students or schedule their release for later.

Moodle areas created through course pages are always closed to begin with. Remember to open them in Moodle when you are ready to let students in your Moodle area. 

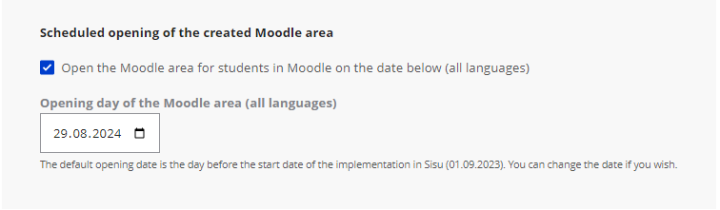
Alternatively, you can schedule Moodle areas to be opened on a specific day by adding the desired date to course pages. In this case, students can see information on the release dates for Moodle areas on course pages. Moodle areas are opened on the day of your choice at 00.00. 

Pic of the user interface how to schedule Moodle area


If your courses have teaching groups in Sisu, you can export these groups to Moodle.

To export groups, click ‘Export groups to Moodle’. The button will only be displayed on the page if the course has teaching groups in Sisu. You can export teaching groups from the course page again if more participants are added to the groups or if participants switch groups in Sisu. 

NB! Scheduling and teaching group export are only available for Moodle areas created on course pages.

For further information on creating Moodle areas, see Moodle instructions. The instructions also show how to import content to new Moodle areas from old ones. 

Send email to course participants

In the course page edit view, you can send email to students whose registration for the course has been confirmed.

How to send email to students:

  • Log in to the course page.
  • Click ‘Edit’.
  • Click ‘Email to students: New email’.
  • Write the message.
  • If you wish for students to be able to respond to your message, add your email address under ‘Response address’.
  • If you decide not to send the message after all, delete the draft by clicking ‘Remove draft’.
  • Send the message by saving the course page.
  • These messages will also be sent to your own email.

Email messages sent to the course participants are displayed on the course pages to ensure that students arriving after the message has been sent will also receive all the necessary information. If you wish, you can make the message invisible on the course page. However, all sent messages will continue to be displayed in the course page edit view for those with editing rights for the page. 

NB! Emails can only be sent in the default language version of course pages. The ‘New email’ button does not appear in other language versions.

Request lists of course participants

You can request lists of course participants to your email from course pages. These lists include the following information:

  • Names of course participants
  • Participants’ responses to queries for additional information, if asked at the time of registration
  • Information on students completing a bilingual bachelor’s degree (Tvex). This is indicated in the last column of the list of participants for the relevant students.
  • ‘Teaching hours’ tab, which presents the course teaching hours in the CSV format

How to request lists of course participants through course pages:

  • Log in to the course page.
  • Click ‘Request a list of course participants’.

You will receive the list of participants by email as an Excel file that is compatible with Sisu. NB! Please be prepared for a delay between requesting and receiving the list of participants. The delay can be as long as several hours, at most overnight.

If you wish, you can add the assessment details for the course in the same file and return the file with the assessments for automated transfer to Sisu. 

For instructions on exporting assessments in Excel to Sisu, see Sisu instructions on recording the grades of completed studies.

How to create other language versions of course pages

When editing course pages for the first time, you are asked to select their default language. Usually this is the same as the language of instruction of the course. Create the first version of your course page using the default language you selected and add content to the course page using that language. In most cases, the default language version of the course page is sufficient. 

Once you have entered and saved the content to the default language version of the course page, you may if necessary create other language versions of your course page. Select the language (Finnish, Swedish or English) in the course page edit mode and add the content in your chosen language.

Display-view: Adding to a language version

The material and links added to the first default language version will be displayed as default also in other language versions. You may change them to material in the corresponding language if available.

Course page archive

Under the ‘Teacher’ role on Flamma, you can see course page links for previous courses in the current and previous academic years

Links to old course pages up to the academic year 2020–2021 are available through the course search in the Studies Service and on all course unit pages.

Older course pages from autumn 2016 to spring 2020 linked to the Oodi system have been archived. A browsable archive can be accessed on the University network or through a VPN connection. Archived course pages can no longer be edited, nor can their content be copied to new pages with the course page copying feature.