Publishing Unitube videos in Moodle

Belongs to themes:

By selecting a degree programme you are able to see the general content as well as the possible degree programme-specific content.

Moodle has a file size limit (50 MB) which limits uploading videos directly to Moodle. Use Unitube Uploader when you want to add a video to your Moodle course, because Moodle does not have the capacity to store large video files.

Unitube Viewer is the University of Helsinki's own video publishing channel, through which university community members publish video recordings of research, teaching and university activities.

Unitube Uploader is for uploading and storing your recordings and managing the publishing rights of your recordings. In Unitube Uploader, you choose the way in which you want your video to be accessed:  1) Public, 2) Shared with a link or 3) Shared only in a Moodle course.

1 Public: Videos are in Unitube Viewer and allowed to appear in search engine results.

  1. Make sure the recording is in a collection in Unitube Uploader. If not
    1. create a collection and
    2. add the recording to the collection.
  2. Set up the Visibility: Choose "The collection is public, and its recordings are allowed to appear in public listing on the university website and in search engine results".
  3. Copy the link of the recording.
  4. Go to the your Moodle course and use the link button in the Moodle editor to add the link to Moodle. You can also add a link to the front page of the Moodle area using the URL Resource (see Moodle Documentation for details).

2. Shared with a link: Anyone who receives a link can view or share the recording.

  1. Make sure the recording is in a collection in Unitube Uploader. If not
    1. create a collection and
    2. add the recording to the collection.
  2. Set up the Visibility: Choose "The recordings in the collection can be shared and embedded elsewhere using links. Anyone who receives such a link can view or share the recording. Recordings or links to them do not appear on the university website or public search engines."
  3. Copy the link of the recording.
  4. Go to the your Moodle course and use the link button in the Moodle editor to add the link to Moodle. You can also add a link to the front page of the Moodle area using the URL Resource (see Moodle Documentation for details).

3. Shared in Moodle (Not published): Videos will only be shown in the Moodle courses you specify. Add a recording with the Moodle activity.

  1. Make sure the recording is in a collection in Unitube Uploader. If not
    1. create a collection and
    2. add the recording to the collection.
  2. Set up the Visibility: Choose "Not published."
  3. Add the Moodle Course ID code in Unitube Uploader. You'll find the Course ID code in your Moodle course front page, for example if the Moodle course url is https://moodle.helsinki.fi/course/view.php?id=12345, the Course ID is 12345. 

    https://moodle.helsinki.fi/course/view.php?id=12345
  4. Copy the Recording/Collection ID. You need it when you create the connection between Moodle and Unitube.
  5. Go to your Moodle course and click the edit mode on.
  6. Add an activity or resource > choose "Unitube (all videos from a series)" or "Unitube (single video from a series)".
  7. Give the Activity name, for example "See the recording (deadline 1.1.2025)".
  8. Click "Show more" > set up "Custon parameters": 
    * id= copy the Recording ID from Unitube Uploader here  OR
    * series= copy the Collection ID from Unitube Uploader here
    For example series=12d23db5-ba6b-49f9-aadf-1423f9cb0b8a   

    Custom parameter field in Moodle
  9. Save.

Embed a Unitube video in Moodle

  • Copy the embed code of the recording in the Unitube Uploader (<iframe src=...). 
Embeded code in Unitube Uploader
  • Add the embedded recording in Moodle to the place of your choice, e.g. in a Page Resource. Add the embed code in the html view of the Moodle editor. Open the html view by choosing "Tools" -> "<> Source code" (see picture below).
Image of Moodle's text editor. The Tools tab is open an option "Source code" is highlighted.


Note: If the publicity of the embedded recording is "shared in Moodle", the viewer must first click on the activation link in Moodle. Create an activation link:

  1. Go to your Moodle course area and click the edit mode on.
  2. Click on "Add an activity or resource" > choose "UniTube activation". If you cannot find the activity, add it to the activity chooser:
    * Go to the Moodle course front page: More > LTI External tools > UniTube activation = show in activity chooser.
  3. Give the Activity name, for example "Click here, if the the video is not playing".
  4. Save.
  5. This activation link needs to be clicked once (and go back to e.g. the course homepage) and all videos embedded for that Moodle course area will start to play on that login. One activation link is sufficient for one Moodle area.

Frequently asked questions

Where can I find more detailed instructions on how to use Unitube Uploader?

See Unitube Uploader (IT-Helpdesk) 

Why is my video not showing?

Sometimes waiting helps. That gives the external tool some time to connect the information you have updated between Moodle and Unitube Uploader. If the Unitube video still does not play, check the following:

  1. The visibility settings at Unitube Uploader in the Collection
     
  • Public: Choose: "The collection is public, and its recordings are allowed to appear in public listing on the university website and in search engine results"
  • Shared with a link:  Choose: "The recordings in the collection can be shared and embedded elsewhere using links. Anyone who receives such a link can view or share the recording. Recordings or links to them do not appear on the university website or public search engines."
  • Shared only in the Moodle course:

    • Choose: Not published.
    • Collection's Moodle course ID code is right. In Unitube Uploader you must add the ID numbers of all the Moodle course areas in which you want to display the videos. Please note, that if you use videos in a new Moodle area and you have imported the videos from the old area, it is easy to forget to add the Moodle course ID numbers in Unitube Uploader.
    • You have copied the recording link of the correct video from the Unitube Uploader and pasted it to Moodle. The link must be exactly the same as the one in Uploader.

    2. The settings in Moodle are correct:

  • You have selected the correct activity in Moodle: "Unitube (all videos from a series)" or "Unitube (single video from a series)" depending on whether you want to add the whole collection or a single recording.
  • The "Custom parameters" must be defined correctly in the external tool in Moodle: When you use the External tool
    • Unitube, single video from series > insert: id= and paste the Video ID you copied from Uploader.
    • Unitube, all videos from a series > insert: series= and paste the collection ID you copied from Uploader.
    • Unitube activation > leave the field empty.
  • Make sure that you have not added irrelevant settings in the activity settings, e.g., the “Shared secret” field must be left empty.

Why does Moodle show videos other than my own collection?

Check:

  1. You have selected the Moodle activity "Unitube (all videos from a series)".
  2. Moodle activity settings: "Custom parameters" starts with series=. If series= is not set in the Description field, then all public videos from Unitube will appear in Moodle. It is therefore important to put the series= text in the right place.

 Can my Unitube video contain confidential or sensitive material?

No, it cannot - even if it's a recording shared only in your Moodle course. The Unitube terms of use contain information about security and copyright, among other things.

How can I disable automatic video embedding?

If you wish to have a text-based link in Moodle, the link has to be written as https://unitube.it.helsinki.fi/unitube/index.html?id=RECORDING’s_ID_HERE.

How can I adjust the size of the video I embed?

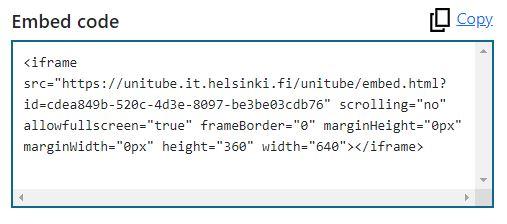
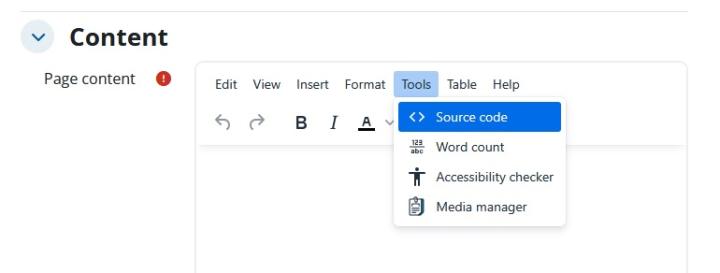
To resize an embedded video in Moodle, go to the embedded recording in the html view of the Moodle editor.

Moodlen editori, jossa ensimmäinen ja viimeinen painike korostettu. Sisältökentässä Lataamosta kopioitu upotuskoodi.

The size of the embedded file can be modified in the "height" and "width" sections of the code. The most typical sizes for videos are:

  • 426 x 240 (240p)
  • 640 x 360 (360p)
  • 854 x 480 (480p)
  • 1280 x 720 (720p)
  • 1920 x 1080 (1080p)
  • 2560 x 1440 (1440p)
  • 3840 x 2160 (2160p)

The videos are in the other teacher's collection on the Unitube. How do I get them on my Moodle course?

If the videos are public, you'll find them on Unitube Viewer and you can link them to your Moodle course. Otherwise, ask the other teacher to give you management rights in the Unitube Uploader, see Collections, sharing them and administrator rights (IT Helpdesk).