Building a Digital Learning Environment

Belongs to themes:

By selecting a degree programme you are able to see the general content as well as the possible degree programme-specific content.

Even if a course is delivered through remote teaching, its planning largely follows the same principles as classroom-based instruction. It is important to consider the student group (i.e., the target audience), the content of the teaching, materials, possible student engagement tasks, other learning assignments, and the assessment of learning.

Additionally, when establishing a new digital learning environment, it is advisable to take into account your own skills and energy resources. You should also assess your need for training or support with the desired digital tools, especially if they are new to you.

Designing a Digital Learning Environment

When designing the digital environment for a course, it is important to consider which digital tools best support the course objectives. Below is a list of potential tools, but their detailed use should be explored through each tool’s own instructions.

At the University of Helsinki, the primary digital learning environment is Moodle, where you can publish course-related instructions, schedules, learning assignments and their submissions, remote exams, assessments, and more. Instructions for Moodle and instructions for ordering course areas can be found in the university’s Instructions for teaching and the Teacher’s Moodle Guide.

For remote teaching and real-time interaction, the University of Helsinki uses Zoom. Zoom is suitable for lectures, seminars, group teaching, and small group activities conducted remotely or in hybrid format. Note that Zoom does not store course materials, so it must be supported by Moodle for teaching purposes. Please refer to the instructions on how to create a Zoom course area.

In addition to Moodle and Zoom, the course may also utilize the following separate engagement tools:

  • Presemo: Suitable for creating chats, polls and surveys.
  • Miro: A more advanced whiteboard tool for collaborative knowledge building.

Zoom includes a basic whiteboard and a polling feature, which enable various forms of student engagement. These tools are best suited for remote teaching. In hybrid teaching, it is often better to provide the entire group with a shared engagement tool that is separate from Zoom (e.g., Presemo). This way, participants who are physically present do not need to launch the Zoom application to take part in activities. This approach also helps reduce issues such as audio feedback and the risk of exceeding the room’s network capacity.

Creating and Publishing Educational Videos

Courses may also include educational videos produced by the teacher.These videos are often too large to be uploaded directly to the course’s Moodle area (maximum file size is 50 MB), so they must first be published on a separate video hosting platform. At the University of Helsinki, the following platforms are used for publishing videos:

  • Unitube Uploader: Videos can be shared via a fully public link, a private link, or embedded within a Moodle course area with restricted access.
  • Thinglink: Used for 360-degree videos and interactive visual content.
  • OneDrive / Stream / Teams: Videos can be shared via a link or restricted to a specific group based on user credentials.

Publishing Student-Produced Videos

Unitube is suitable for publishing video material produced by both teachers and students. In Unitube, videos related to teaching can be published with so-called Moodle-restricted access, meaning they are only visible to users within the specific Moodle course area. If Moodle restriction is not necessary, the share via link feature in Unitube can be used. This provides a hidden link that can be freely shared using any chosen medium (e.g., a blog). Viewing the video does not require logging in, so anyone with the link can access it. Videos restricted to a Moodle area cannot be viewed outside that specific course, making them somewhat more protected. However, this restriction is entirely controlled by the teacher and requires teacher rights in Moodle. Therefore, it is best suited for videos produced by the teacher, not for videos shared by students.

The image shows the "Shared via link" option selected, which is the easiest way to share a video without making it discoverable online.

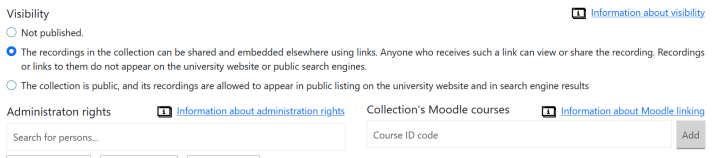
Image 1. Unitube Uploader video collection Visibility settings, where "Shared via link" is the easiest way to distribute a video without making it publicly discoverable online.

If video material is produced collaboratively during the course, it can be collected using Unitube Uploader as well as OneDrive, which is part of the university’s O365 services. With a shared Onedrive folder created by the teacher, students can submit their work to a common location, from which the videos can then be published as desired (e.g., as a video series in Unitube Uploader). Videos can also be viewed directly in OneDrive, but it is not recommended as a long-term publishing platform.

In teaching, it is important to agree together on how student-produced videos may be shared and used. For example, will some of the material be fully public, while other parts are only for use within the course group? Such agreements help prevent the material from ending up in the wrong hands. It is always possible for video content to spread, regardless of the level of protection. For instance, screen recording software can be used to capture a video if it can be viewed on a personal device. Highly private material (e.g., a training situation) should not be uploaded directly to any video viewing platform. If necessary, such content can be shown to students during a classroom session.